Driver App Guide
For drivers using the MyPlacard Driver app on iPhone or Android. Your car service sets you up and sends your invite.
About the driver app
The MyPlacard Driver app is how you receive, run and finish trips for your car service. It shows you who you are picking up and where, gets you to the pickup, takes you through the trip, adds up your tolls and tips, and shows what you have earned. Your car service (the “Operator”) decides your trips and pays you; the app only shows you what you are owed.
The screens below are from the iPhone app with sample trips. The Android app works the same way; its small differences are in Android notes.
Getting started
- Get your invite. Your car service adds you and sends a text message with a link to your phone. Open it to choose your password. Make sure your car service has your correct mobile number.
- Install the app. Download MyPlacard Driver from the App Store (iPhone) or Google Play (Android).
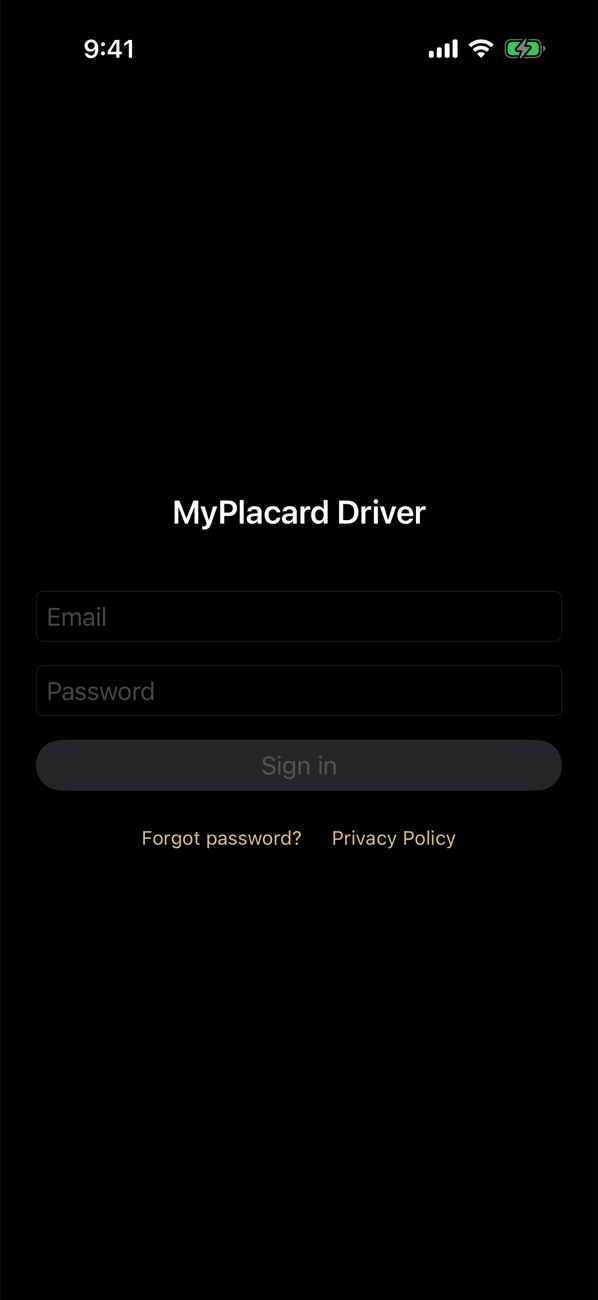
- Sign in with your email and password. If you forget your password, tap Forgot password? on the sign-in screen: a link to choose a new one is texted to the phone number your car service has for you. Your car service can also send you a new link.
- Agree to location sharing. The first time you go online, the app shows “Location while you’re online”. Read it and tap I agree — continue. This is separate from your phone’s own location question. Location sharing is how dispatch can match and route you, and it only runs while you are online.
- Answer your phone’s prompts. Allow location (choose While Using the App first; your iPhone may then offer Always, which you should choose so you keep being tracked when your phone is locked or mounted) and allow notifications, which carry your trip reminders.
The home screen
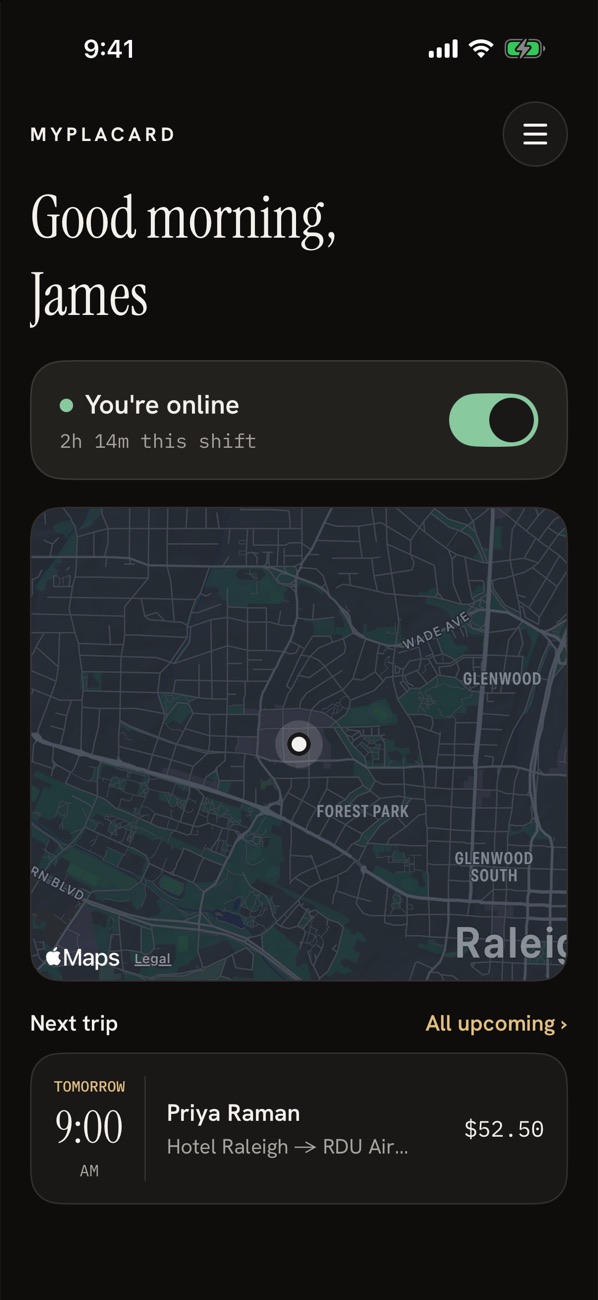
When you have no trip in progress, the home screen shows:
- A greeting, and the menu button (three lines) at the top right.
- Your online switch, with how long you have been online this shift.
- A map with your position.
- Your Next trip: the day and time, the rider, the route and what you will earn. All upcoming opens your full list.
When you have a trip assigned or under way, it takes over the screen (see below). A small status pill at the top left reads Online, On trip, or Offline.
Going online and offline
Use the online switch. While you are online, the app shares your location with dispatch, you can be given trips, and the app checks your drive time to upcoming pickups. When you go offline, location sharing stops. You can switch off even in the middle of a trip, from the same card.
Tip: keep the app open or running in the background while you are online, with your phone mounted and charging. On an iPhone, don’t swipe the app away while you are online: that stops your location from being shared.
If your phone’s location is switched off, the app shows a “Location is off” alert instead of quietly going online untracked. Turn location back on in your phone’s settings.
Running a trip, step by step
A trip moves through four steps. The strip near the top of the trip card shows where you are: Assigned, En route, Onboard, Done.
1. Assigned
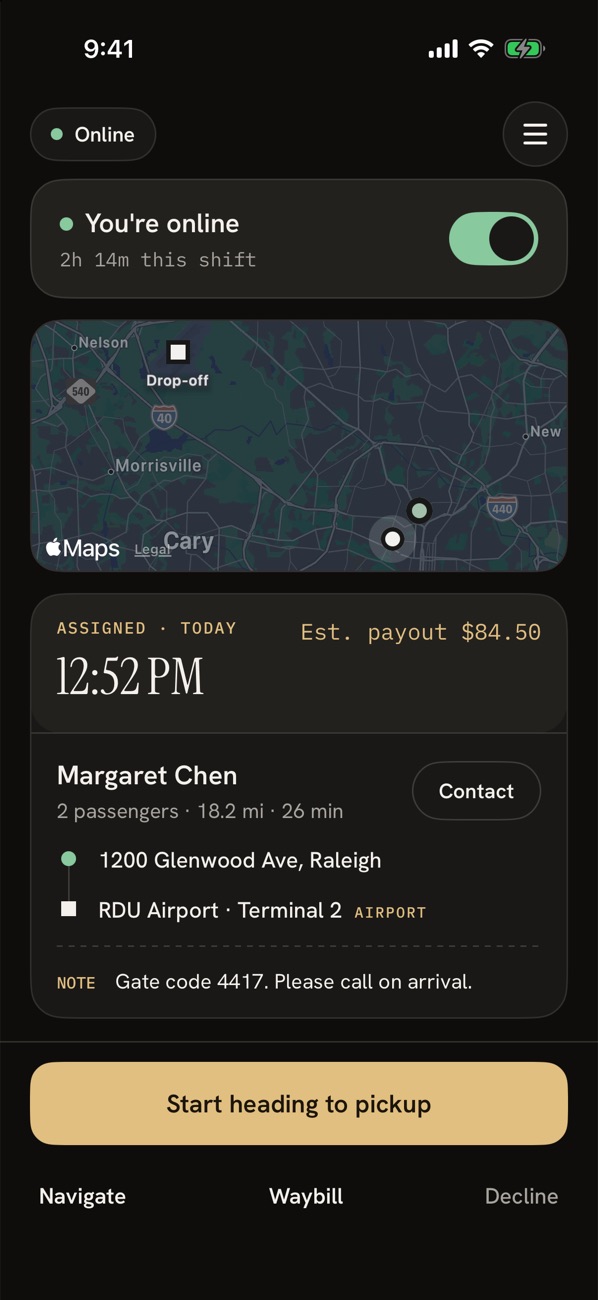
When dispatch gives you a trip it appears on your home screen (while you are online the app checks for new trips about every 5 minutes). The card shows the pickup time and Est. payout, the rider’s name, passenger count, distance and time, the pickup and drop-off (an AIRPORT tag marks an airport), any Note from the rider or dispatch (like a gate code), and a Contact button. Below it are the buttons:
- Start heading to pickup — tap when you set out. The trip becomes En route.
- Navigate — opens your map app to the pickup.
- Waybill — opens the trip’s digital waybill.
- Decline — only shown when you are allowed to decline (see Declining a trip).
2. En route
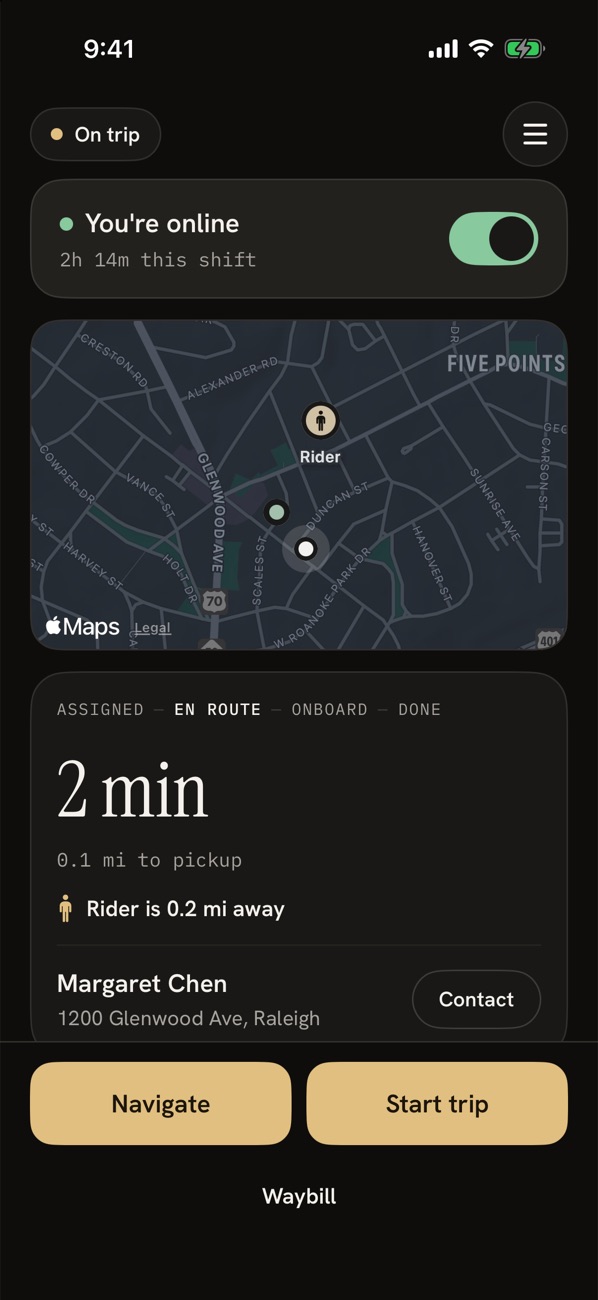
The card shows your estimated minutes to the pickup and your distance to it. Tap Navigate for directions. The Start trip button stays locked, with the note “within 0.5 mi”, until you are within half a mile of the pickup, so you can’t start a trip from somewhere else by accident. When you have the rider in the car, tap Start trip.
3. Onboard
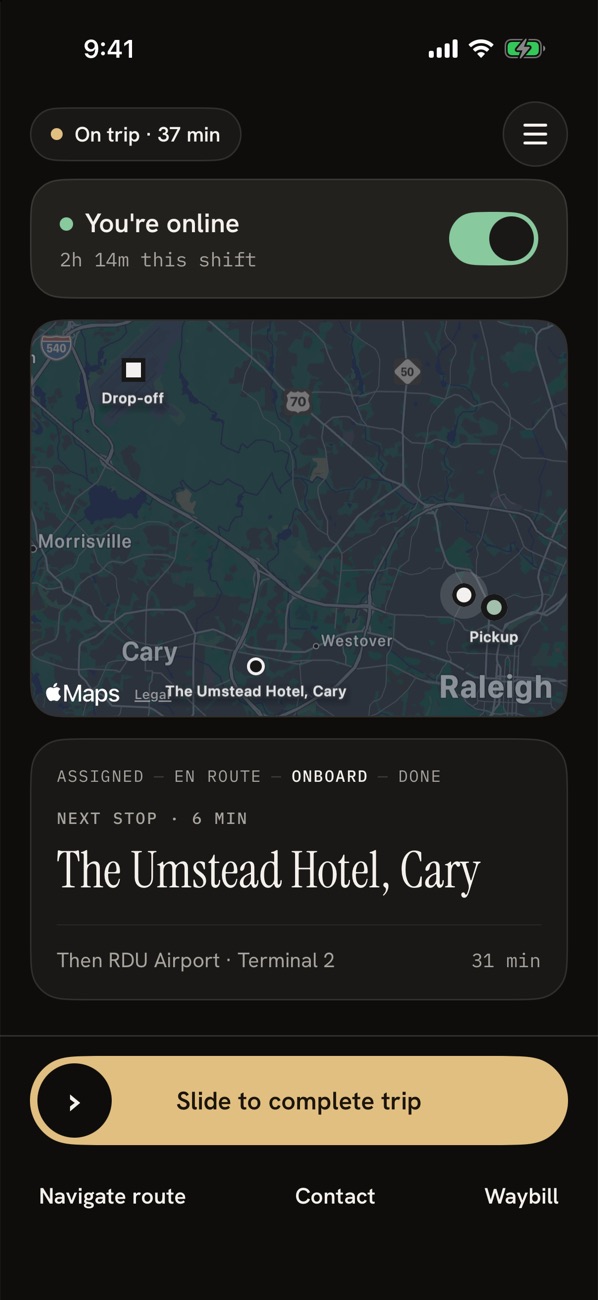
The card now shows the next stop and how long it will take, and what comes after it. For a trip with extra stops it goes stop by stop and then the drop-off. Navigate route opens your map app to the next stop. Use Contact if you need to reach the rider.
4. Done
At the drop-off, slide the gold bar to complete the trip (a slide, not a tap, so you don’t finish a trip by accident). A short sheet asks for any toll. When you finish, the rider’s card is charged automatically, and the trip appears in your Earnings.
Tolls
When you complete a trip, the sheet “Tolls (optional)” asks if there was a toll. The rider’s card is charged for it straight away along with the fare, so enter it carefully.
- If there was no toll, leave it blank (or 0) and tap Done.
- If there was one, enter the amount in dollars and cents. Read the estimated toll off your navigation app’s route (Google Maps shows one once the route appears; it is the one to use).
- Above your car service’s limit (standard is $40) the app asks you to enter the amount a second time, and the two must match, so a typing slip can’t overcharge the rider. For a larger toll the app also asks you to confirm the amount before it charges. No toll over $250 can be entered in the app.
- If you forget a toll, tell your dispatcher: they can add one afterwards.
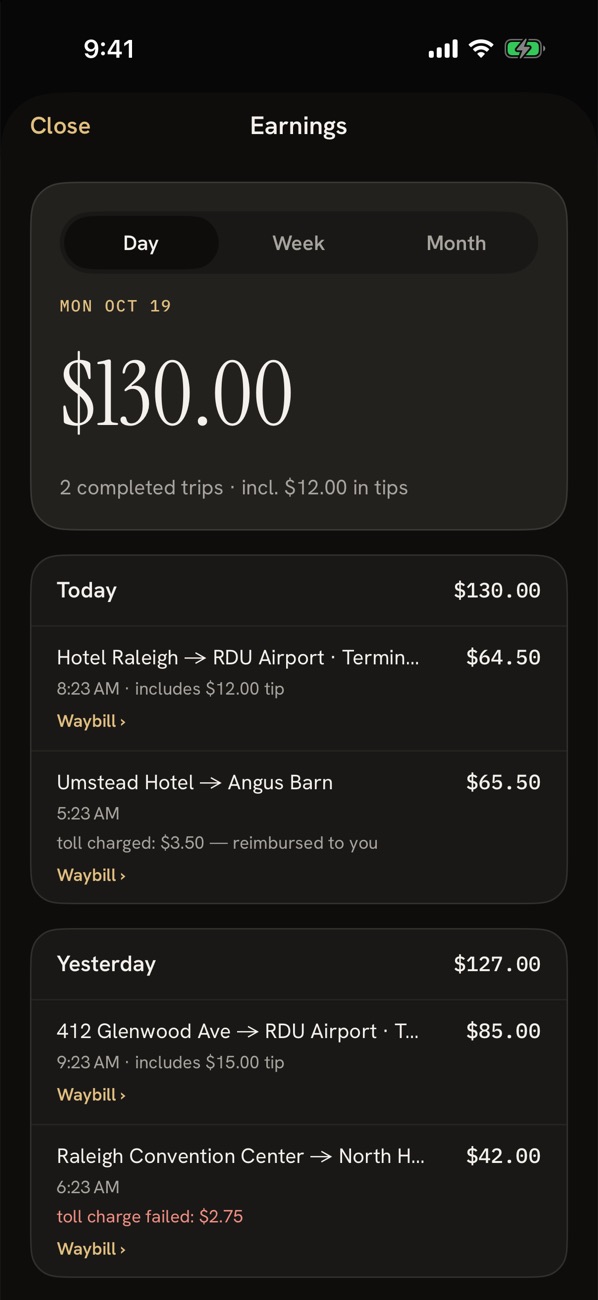
- Tolls and airport fees on your own car are paid back to you, and the Earnings screen says so. If a toll’s charge fails, the trip shows “toll charge failed” in red so that you and your car service can sort it out.
Navigating
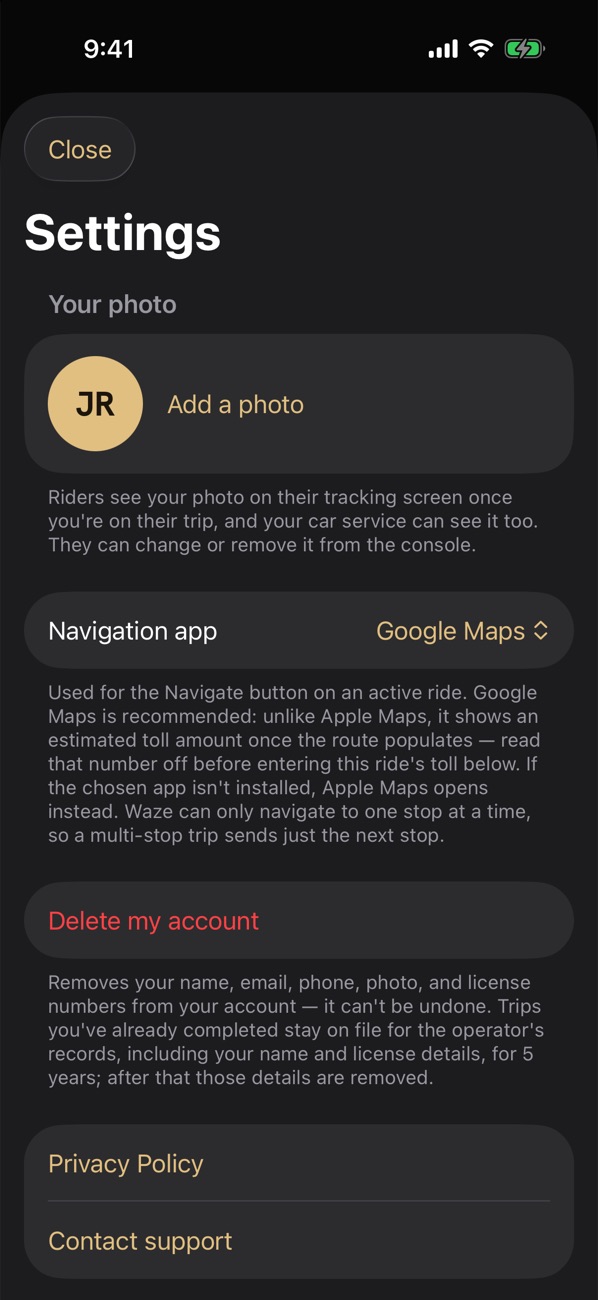
The app doesn’t give turn-by-turn directions itself. Navigate hands the trip to the maps app you prefer. Choose it in the menu under Navigation app: Google Maps (recommended, because it shows the toll estimate), Apple Maps, or Waze. If your choice isn’t installed, Apple Maps (on Android, your phone’s default maps app) opens instead. Waze can only take one stop at a time, so a trip with several stops sends just the next stop.
Contacting the rider and finding them
- Tap Contact beside the rider’s name and choose Call or Text. It uses their real number.
- Read the Note on the trip card: it may hold a gate code or a request such as “please call on arrival”.
- Finding the rider. If the rider has chosen to share their location, then once you are on the way and within about a mile of the pickup, a Rider pin appears on your map and the card says “Rider is 0.2 mi away” (it updates every 30 seconds). If they were sharing and it stops, you will see “Rider’s location unavailable”. If the rider never turned it on, you see nothing about it. The rider’s location is only for the pickup: it disappears when you start the trip.
Rides booked for someone else. Sometimes one person books a ride and someone else rides. The name and number on the trip, and the Contact button, are then the passenger’s, and the card says “Booked by” the person who ordered it. Call or text the passenger, not the person who booked. Everything else works the same, including the passenger’s own location pin if they choose to share it.
Reminders and warnings
- Pickup reminders. For a scheduled trip you get a notification 3 hours, 2 hours and 1 hour before pickup. If you haven’t gone online by the 1-hour reminder, it tells you to.
- “Time to head to pickup.” While you are online, the app checks your drive time to your next scheduled pickup every few minutes. When it is time to leave, a banner tells you the leave-by time and offers Navigate.
- “You may be late.” A red banner appears if traffic or your position puts you behind. It offers Call rider so you can let them know. Drive times are estimates.
When a trip changes
A rider or your car service can change a scheduled trip (the time, the addresses, the stops or the passenger count). The app notices: you get a notification, “A trip was changed”, and a banner at the top of the home screen says what moved. Read it, then tap Got it. Your reminders move with the new time. If the app was closed when the change was made, you will see it the next time you open the app.
Declining a trip
If you can’t do a scheduled trip, tap Decline on the assigned card, add a reason if you wish (it is optional), and confirm. The trip goes back to dispatch to be given to someone else.
- Decline only appears if your car service allows it. They set how many hours before pickup you may decline on your own. Closer than that, or for a “now” trip, call dispatch instead.
- Once you have set out on a trip (En route or later) you can’t decline it.
Upcoming trips
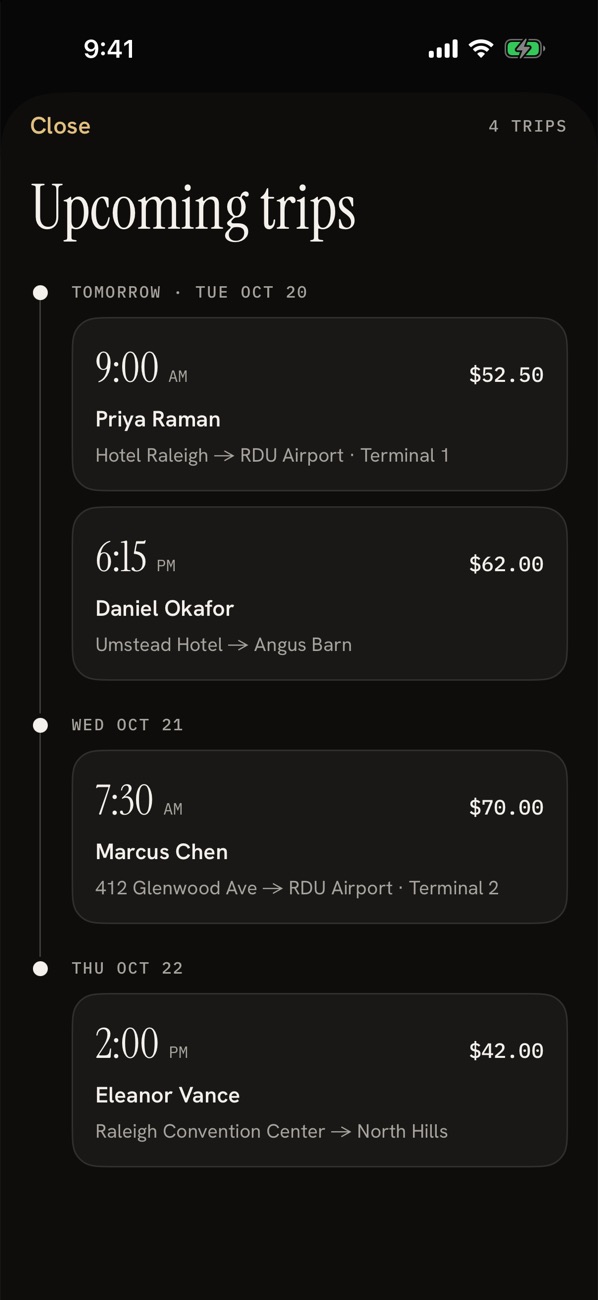
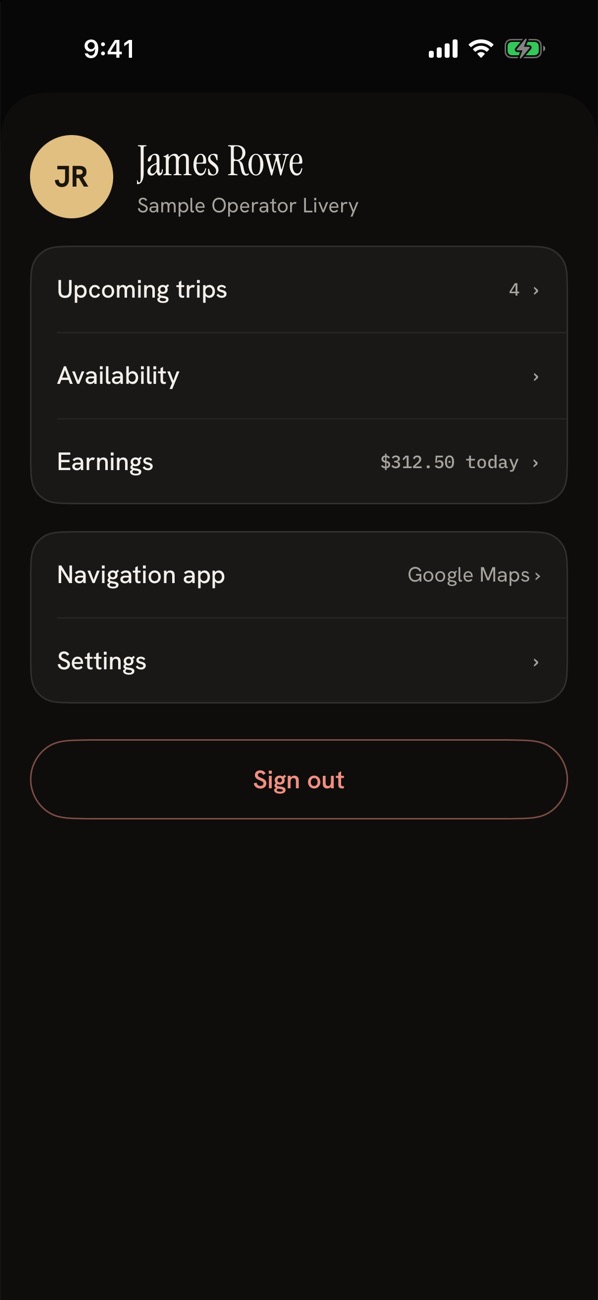
Open the menu and choose Upcoming trips, or tap All upcoming on the home screen. It lists your scheduled trips by day with the time, rider, route and payout. The trip already on your home screen isn’t repeated here.
Availability and days off
Tell your car service when you work, so they only schedule you when you can. Open the menu and choose Availability. There are two parts:
- Weekly. Your usual week. Under each day, add the hours you normally work (for example Monday 9 AM to 5 PM) and delete any you don’t need.
- Calendar. One-off changes. Tap a date and either switch on Day off, or give custom hours for that day. A red dot marks a day off and an orange dot marks custom hours.
What you enter shows on your dispatcher’s schedule board. A day you have marked off can’t be booked. If you haven’t entered anything, you are treated as available.
Earnings
Open the menu and choose Earnings (the menu also shows what you have made today). Switch between Day, Week and Month. You see the total, how many trips and how much of it was tips, then each day’s trips with the route, time, amount, and any toll note. Tap Waybill on any trip to see its record.
- Your pay for a trip is your share of the fare (the percentage your car service set for you), plus 100% of your tips, plus any tolls and fees on your own car.
- Days, weeks and months follow your car service’s timezone and pay week, so the app and the dispatcher always agree.
- If a trip is refunded or corrected, your car service may adjust what you are owed for it. The app shows what you are owed; your car service pays you, outside the app.
The digital waybill
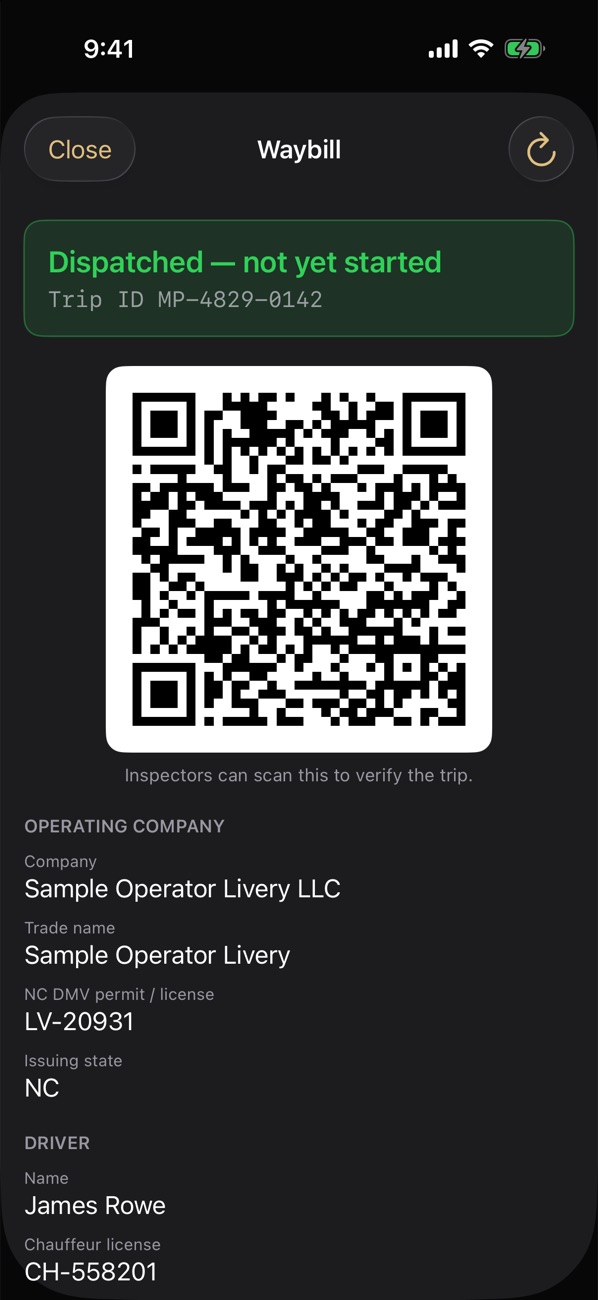
Every trip has a digital waybill: a record an airport officer or inspector may ask to see. Open it from the trip card (Waybill), or from a past trip in Earnings. It shows:
- A status banner (for example “Dispatched — not yet started”) and the trip ID. Tap the refresh button to update it.
- A QR code. An inspector scans it to open the trip’s verification page. They see the trip’s status, your car service’s permit, your name and license details, the vehicle, and the pickup and drop-off, with the rider shown only by first name and last initial, and no phone number or fare.
- Your car service’s details, your credentials, and the vehicle’s plate, registration and insurance.
A copy of your current trip’s waybill is saved on your phone, so it still works with no signal, and it is deleted when you sign out.
Settings, your photo and your account
Open the menu, then Settings.
- Your photo. Tap Add a photo (or Change photo) and choose a picture from your photos. A screen opens where you drag the picture and use the slider or a pinch to zoom; the circle shows what riders will see. Tap Use this photo. Remove photo takes it down, and riders see your initial instead. Riders see your photo on their tracking screen once you are on their trip, and your car service can see it too.
- Navigation app. Choose Google Maps, Apple Maps or Waze (see Navigating).
- Delete my account. Removes your name, email, phone, photo and license numbers from your account. It can’t be undone. Trips you have already completed stay on file for your car service’s records, including your name and license details, for 5 years, and those details are then removed.
- Privacy Policy and Contact support. The app version is shown at the bottom, which is handy to read out when you report a problem.
Signing out is the last button in the menu. It also clears the saved waybill and trip details from your phone.
Android notes
- The first time you go online on each Android phone, the app shows the same location agreement, once per device.
- While you are online the app shows a “You’re online” notification. Android requires it for an app that shares your location with the screen off. Leave it be; it goes away when you go offline.
- Allow location all the time if Android asks, so tracking continues when the phone is locked.
- The map is drawn with OpenFreeMap. Your default maps app opens if your chosen navigation app isn’t installed.
- Everything else, including the trip steps, tolls, availability, earnings and waybill, works the same as on the iPhone.
If something goes wrong
- I can’t sign in. Tap Forgot password?. If no text arrives, ask your car service to check your phone number and send a new link.
- I can’t go online. Check that location is on for the app and that you have agreed to location sharing. Look for the “Location is off” alert.
- I don’t see my trip. Make sure you are signed in and online, then give it a few minutes (the app checks about every 5 minutes), or open Upcoming trips and pull down to refresh. If it still isn’t there, call dispatch: it may not be assigned to you yet.
- Start trip is locked. You need to be within half a mile of the pickup. Check that your location is on and give it a moment to update.
- The rider isn’t there. Use Contact to call or text them, then call your dispatcher before you leave.
- A toll didn’t charge, or I forgot to enter one. Tell your dispatcher; they can add or fix it.
- The details are wrong (rider name, addresses, payout). Call dispatch: only your car service can change a trip.
- Anything else: open Settings → Contact support, or email support@my-placard.com, and mention the app version.
Shift cheat sheet
Before your shift
- Phone charged and mounted. Location set to Always (all the time on Android). Notifications allowed.
- Check Upcoming trips and your Availability for the week.
- Switch online.
For each trip
- Read the card and the Note. Tap Start heading to pickup.
- Navigate; use Contact if needed. When you are within 0.5 mi, Start trip unlocks.
- Onboard: follow the next stop. At the end, slide to complete, and enter any toll (blank if none).
After your shift
- Switch offline. Check Earnings for the day.