Operator Console Guide
For the owner and staff of a car service: admins and dispatchers. Open the console at console.my-placard.com.
Who this guide is for
The console is where you run your car service: you set your prices and rules, add your drivers and vehicles, watch trips as they come in, assign them, and see what your business earns. Your riders use your branded rider app, and your drivers use the driver app; this guide covers only the console. The driver app and the rider app each have their own guide: drivers and riders.
Admins and dispatchers
Everyone who signs in to the console is either an admin or a dispatcher.
- Admins can do everything: change Settings, see what each driver is paid, issue refunds, add corrections, see Earnings, Finances and Payments, manage corporate accounts, and invite or remove team members.
- Dispatchers run the day: they see Overview, Rides, Schedule, Live map, Drivers, Vehicles, Riders and Analytics, can assign, reassign, cancel and change trips, and can review or add a toll. Settings is read-only for them, and they don’t see driver payout percentages, license numbers, or the pages that show what drivers are paid and what the business keeps.
Tip: if a page tells you it is for admins, or a field is greyed out, that is your role, not a fault. Ask an admin.
Quick start: set up your company
Do these in order. Most of it is a one-time job of under an hour. Everything is under Settings unless it says otherwise.
- Sign in. Your email and password are set when you are invited. If you forget the password, use “Forgot password” on the sign-in page. You can change it any time under Settings → Account.
- Branding. Upload your logo, set your company name and your primary and accent colors. This is what riders see in the rider app. Under “Receipt details” add the business address, phone and email you want printed on every receipt.
- Location. Choose your operating timezone and which day your pay week starts. Every day, week and month in the console, and in the driver apps’ earnings, follows these. Then enter your service area (a latitude and longitude for the center of where you work), so the rider app opens its map there and suggests nearby addresses.
- Pricing & Fees. Set your rates (see Pricing & Fees), your vehicle classes, the default driver payout percentage, extra stops, airport fees, and any tax.
- Booking Rules. Decide whether riders can book “now”, how far ahead a scheduled trip must be booked, your free-cancellation window and late-cancellation fee, and how far ahead a driver may decline a trip on their own.
- Airports. Add each airport you serve and the fee you charge there.
- Compliance. Enter your operating authority: legal business name, the agency that regulates you, your permit or license number and its state. It is printed on every driver’s digital waybill.
- Payments & Billing. Connect your own Stripe account so rider payments go straight to you. You must do this before you can take card payments.
- Add vehicles (Vehicles → Add vehicle), then add drivers (Drivers → Add driver), link each driver to their vehicle, and send each driver their app invite. Details are below.
- Invite your team (Team) if you have dispatchers.
- Try it yourself. Book a test trip in the rider app with your company code, assign it, run it from the driver app, and look at the receipt, before you give riders your code. Your code and a QR code are under Settings → Branding, in the “Rider app” box.
The Overview and alerts
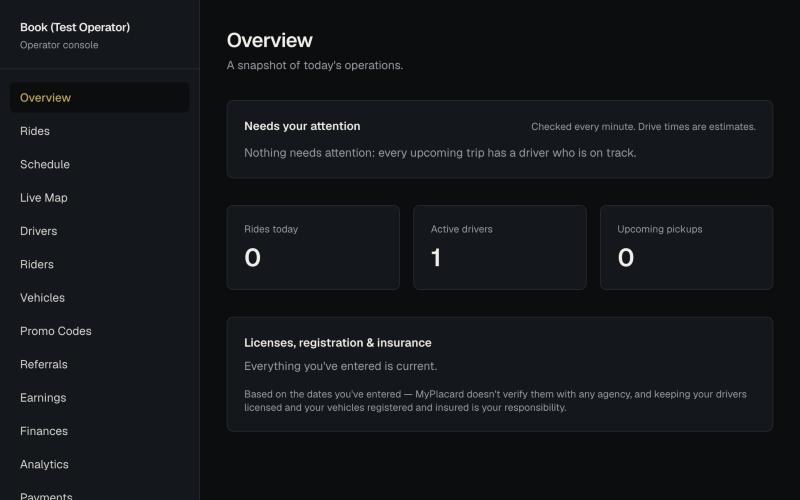
The Overview is your home page. It shows Rides today, Active drivers and Upcoming pickups, then a Needs your attention list. The same alerts appear in a bar across the top of every page, and everything refreshes about once a minute.
A trip appears in “Needs your attention” when:
- It has no driver. A scheduled trip is a warning when its pickup is within 24 hours, and urgent within 4 hours or once the pickup time has passed. A “now” trip becomes urgent after 5 minutes with no driver.
- It is at risk. A trip with a driver, with pickup in the next 3 hours, is flagged if the driver hasn’t set out when it is time to leave, if their last known location is too far to arrive on time, if they are offline or their location is old, or if their earlier trip is running long. Drive times are estimates, made a little pessimistic on purpose.
- A payment didn’t go through. A rider’s card couldn’t be authorized (urgent within a day of pickup), a completed trip’s charge failed, or a trip close to pickup has no payment at all. The top bar counts these too, and the Payments page is where you run the payment again.
- A toll needs review. Any toll over $20, or one a driver corrected, stays here until you open it and mark it reviewed.
- A rider changed their reservation. The trip is flagged until you mark the change reviewed.
Below the alerts, the Overview also checks licenses, registration and insurance. It flags any date you have entered that is expired or close to expiring. MyPlacard does not check those dates with any agency: keeping your drivers licensed and your vehicles registered and insured is your responsibility.
Rides: assign, cancel and change trips
The Rides page has four views across the top:
- Requested (the page opens here): trips waiting for a driver, with “now” trips first, then the soonest pickups.
- At risk: trips with an at-risk alert.
- Today: everything scheduled for today.
- All rides: the full history, with filters for rider, status and scheduled date, and a sort (newest booked, oldest booked, scheduled soonest, highest fare).
Assign or change a driver
- Find the trip and open the Driver menu on its row.
- Choose a driver and press Save. The trip becomes assigned, the rider is told who is coming, and the trip shows up in the driver’s app (it can take a few minutes to appear).
- To take a driver off, choose Unassigned and save. The trip goes back to requested.
If the driver’s license, registration or insurance will have expired by the pickup date, the console warns you and asks you to confirm before assigning. A driver with no payout percentage (and no company default) can’t be assigned at all. A driver you have deactivated can’t be assigned.
The Vehicle menu on a row lets you choose which of the driver’s vehicles a particular trip uses. The Preferred column shows the driver the rider asked for, if they picked one.
Cancel a trip
Press Cancel next to the status of a requested, assigned or en-route trip. You can’t cancel a trip once the rider is aboard. A cancellation from the console never charges the rider, and any card authorization is released. (Riders cancelling their own scheduled trips are different: your late-cancellation rules apply to them.)
Change a scheduled trip
Press Edit on a scheduled trip that is requested or assigned. You can change the pickup time, the pickup and drop-off addresses, the stops, the passenger count and the notes.
- Make your changes and press Review changes. The console shows exactly what will change and the old and new price.
- Press Save changes. The driver and the rider are told what changed.
Tip: the console has no map lookup, so an address you change is typed text and the console can’t re-measure the route. The price stays the same unless you type a new fare before tax, and the form says so. A trip that has been changed shows “Edit · changed”. A rider can change their own scheduled trip in the app until your free-cancellation cutoff.
Rides booked for someone else. A rider can book a ride for another person. In the Rides list the passenger’s name shows with “(booked by …)”, and on the ride’s page a note names the passenger and the person who booked and pays, with both phone numbers. The driver calls and texts the passenger; the receipt goes to the person who booked. The passenger’s name and number are on the waybill and the saved trip record. If you cancel the ride, the passenger is sent a text.
The Schedule board
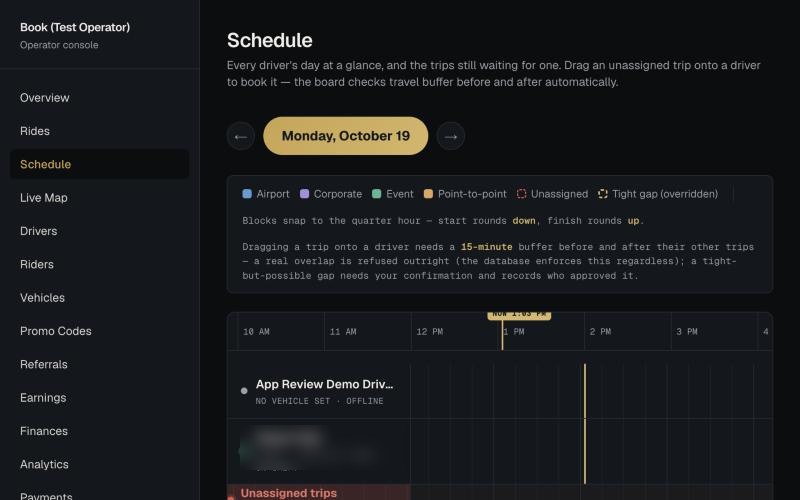
The Schedule shows every driver’s day as a row of blocks, with the trips still waiting for a driver below. Use the arrows to move between days. Blocks are colored by ride type (airport, corporate, event, point-to-point), and blocks snap to the quarter hour.
- Drag an unassigned trip onto a driver’s row to book it. Hovering a trip shows which drivers are free.
- The board needs a 15-minute buffer before and after the driver’s other trips. A real overlap is refused. A tight but possible gap asks you to confirm, and your approval is recorded (the block is marked “Tight gap (overridden)”).
- You can also drag a trip from one driver to another to reassign it.
Each driver sets their own weekly availability and days off in the driver app. Those feed the board, so you can see where a drop would be refused before you try it.
The Live map
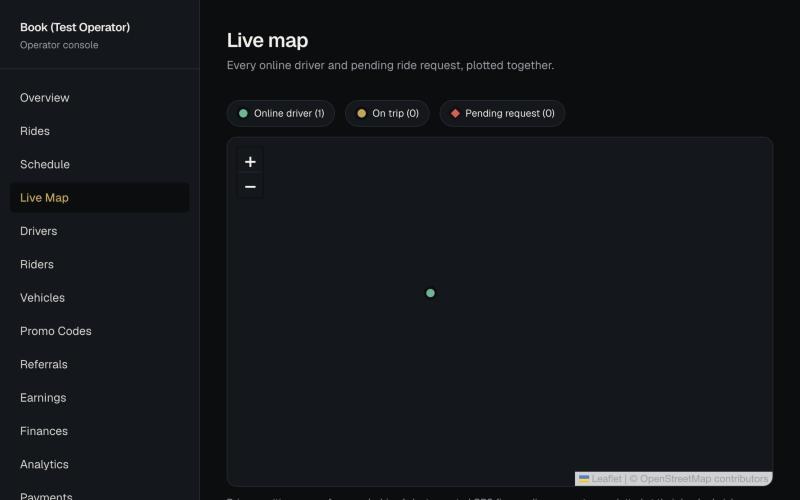
The Live map plots every online driver, every driver on a trip, and every trip waiting for a driver (at its pickup address). Driver positions are each driver’s last reported GPS position. If nobody is online and nothing is waiting, the map says so.
Drivers
Add a driver
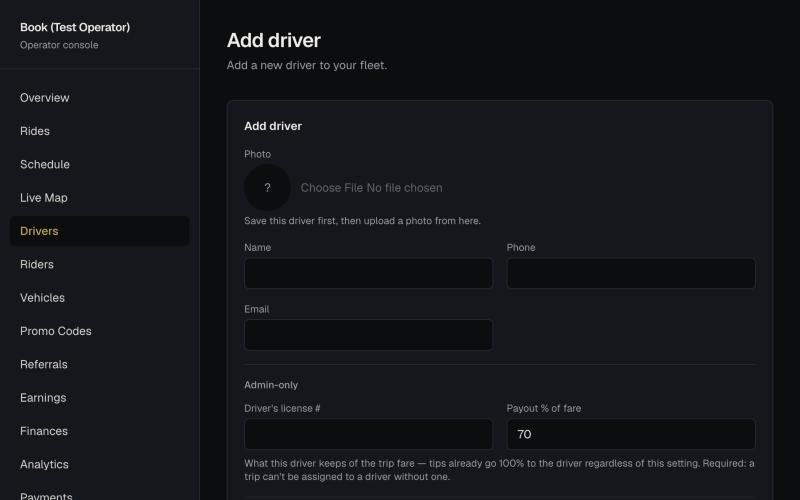
- Open Drivers and press Add driver.
- Enter the name, phone and email. The phone matters: the driver’s app invite and password links are sent there by text.
- Admins also enter the driver’s license number and the payout percentage (what the driver keeps of the fare; it starts at your default). Tips always go 100% to the driver. A trip can’t be assigned to a driver without a percentage.
- Fill in the waybill credentials (chauffeur license, regulatory driver ID, issuing state) and the two expiry dates. These are printed on the driver’s waybill and copied onto each trip they complete.
- Press Add driver. Save first, then open the driver again to add a photo and link vehicles.
Photo
On the driver’s page, choose a picture; a window opens where you drag to move it and zoom with the slider, wheel or a pinch. A circle shows what riders will see. Press the button to use it. Remove photo takes it down, and riders then see the driver’s initial. Drivers can also set their own photo in the app, so you may find one already there.
Vehicles for a driver
On the driver’s page, under Vehicles, add the vehicles the driver can use. The first (primary) one is what trips default to. You can still switch a single trip to another of their vehicles from the Rides page.
The driver’s app login
The Driver-app login card on the driver’s page sends them a text with a link to set a password and sign in (Send invite). If they later forget it, or never finished, press Send password reset link. Drivers can also reset it themselves from the app.
Deactivate a driver
Deactivate on the driver’s page stops them going online, being assigned or being requested by riders. Their past trips are untouched. You can reactivate them later.
What the Drivers list shows
Name, phone, vehicle, payout percentage (admins), tips earned, average rating, credentials status (current, expiring, expired or not on file) and live status (online, offline, on trip). You can search by name, filter by status, or choose Available on a date to see only the drivers who have said they are working that day.
Vehicles
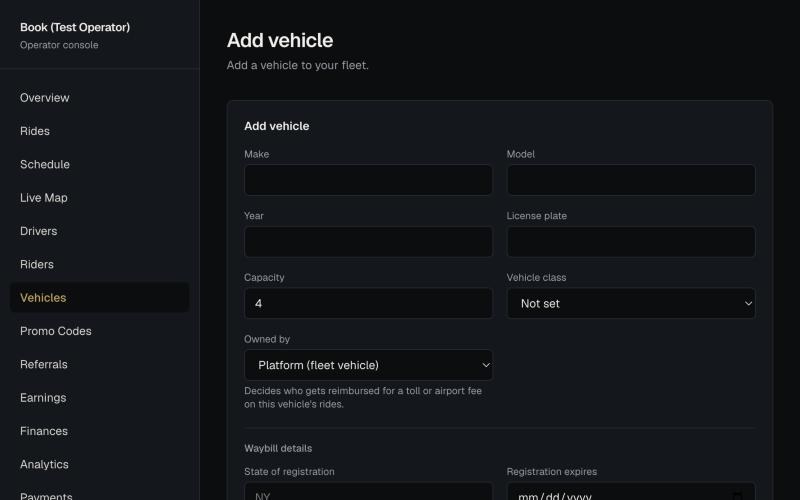
- Open Vehicles and press Add vehicle.
- Enter make, model, year, license plate and capacity.
- Choose the vehicle class (for example Sedan or SUV XL). The class sets the price multiplier riders are quoted, and its seat count can block a booking that is too big.
- Choose Owned by: Platform (fleet vehicle) or Driver (personally owned). This decides who is reimbursed for tolls and airport fees on that vehicle’s trips: the fleet, or the driver.
- Add the waybill details: state of registration, registration expiry, insurance carrier, policy number and policy expiry. These are copied onto each trip.
Your team
Team lists everyone who can sign in to the console. To add someone, fill in their name, email, phone and role (Dispatcher or Admin) and press Send invite: they get a text with a link to set their own password. Resend invite sends it again, and Remove takes their access away (you can restore it). Only admins manage the team.
Riders and referrals
Riders lists every rider with an account: contact details, the corporate account they belong to, number of trips, total spent and when they joined. Referrals shows each rider’s own shareable code and who they have brought in. Referral tracking is for information only: no reward is applied automatically.
Pricing & Fees
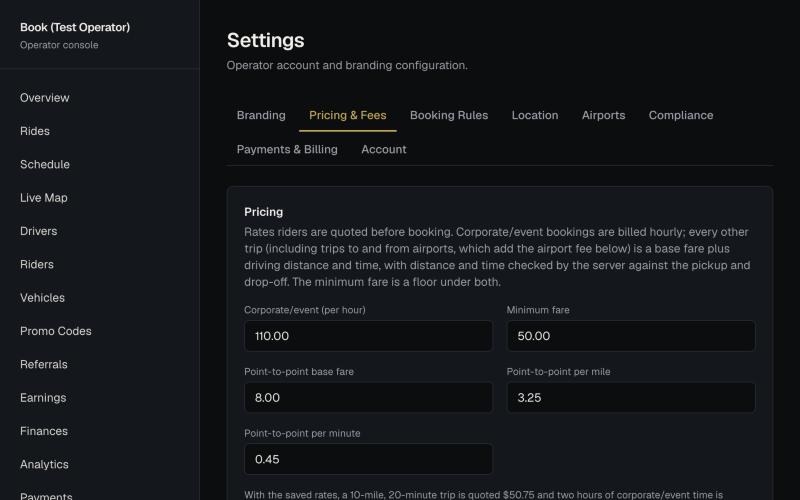
Settings → Pricing & Fees is where every number that riders are quoted comes from. Change a section, then press Save for that section.
- Pricing. Corporate and event trips are billed per hour. Every other trip, including airport trips, is a base fare plus a per-mile and per-minute amount, checked by the server against the real route. The minimum fare is a floor under both. Below the fields, the page shows what a 10-mile, 20-minute trip and two corporate hours would quote with your saved rates, so you can sanity-check them.
- Tolls. The largest toll a driver enters once (it starts at $40; above it the driver must enter it twice and the two must match; no toll over $250 is ever charged). Set 0 to have every toll entered twice.
- Tips. The most all the tips on one trip can add up to (blank means the greater of $100 or the fare before tax; never more than $1,000). A cancelled trip can’t be tipped and a completed one can be tipped for 30 days.
- Vehicle classes. What riders choose between, each with a price multiplier (a 1.40 SUV multiplier turns a $65 rate into $91), and an optional seat count. Use Add class, Save and Delete.
- Driver payouts. The default percentage of a fare a new driver keeps. It is prefilled when you add a driver, and you can still set each driver’s own.
- Extra stops. How many extra stops a rider can add, and the fee per stop (charged for each stop, not once). Set the maximum to 0 to turn extra stops off.
- Airport fees. A flat fee for airport trips, and whether it applies to the pickup, the drop-off or either end. Once you add airports in the Airports tab, each airport’s own fee is used instead.
- Taxes & fees. None, a percentage of the fare, or a flat amount per ride. One rate applies to the whole operator.
Airports (its own tab): choose each airport you serve from the list and set its fee. MyPlacard recognizes an airport trip from where it starts and ends, not from anything the rider ticks, and a trip pays the fee for each airport it touches.
Booking rules and cancellations
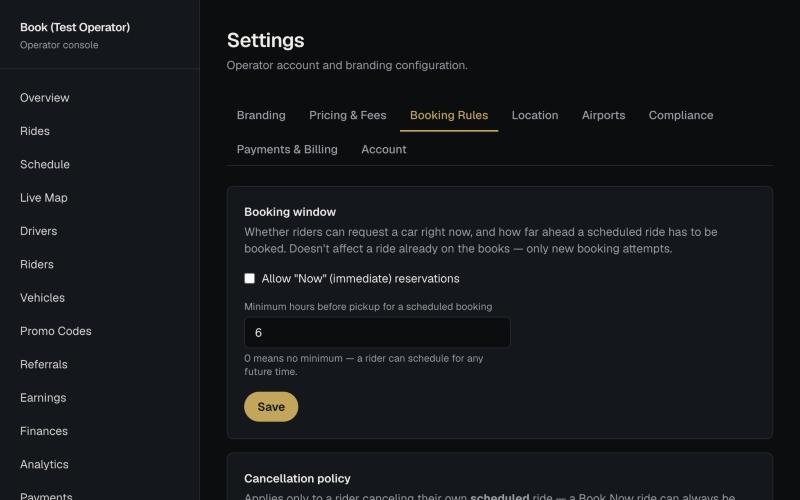
Settings → Booking Rules. These affect new bookings only, never a trip already on the books.
- Payment before dispatch. Turn this on to stop a ride being given a driver until its payment is in place (the fare held on the rider’s card, the card saved for a trip still days away, or a company on invoice). A ride whose card was declined or never paid stays unassigned, with the reason shown, until it is paid. It only applies when your Stripe account can take cards, and it never affects a ride that already has a driver. Off by default.
- Booking window. Allow “Now” (immediate) reservations or not, and the minimum hours before pickup for a scheduled booking (0 means no minimum).
- Cancellation policy. A rider cancelling at least this many hours before pickup always cancels free. Later than that, the late-cancellation fee applies, as a flat amount or a percentage of the fare. It covers only a rider cancelling their own scheduled trip: a “now” trip can always be cancelled free, and so can anything cancelled from the console.
- Driver ride rejection. How many hours before a scheduled pickup a driver may decline their own assignment from the app without calling you.
The website quote widget
Put a quote box on your own website. A visitor enters a trip and sees a price from your current rates, held for 24 hours so they can book it at that price. They can also have the quote emailed to them; when they do you get their name and email.
- Open Settings → Website Widget (an admin does this) and tick Show quotes on my website, then press Save.
- Press Copy on the line of code and paste it into your website where the box should appear (most website builders have an “embed” or “custom HTML” block). It fits the space, uses your name, logo and colors, and works on any website. The Preview below shows what visitors see.
- When someone requests a quote it appears on the Quotes page: when they asked, their contact details if they left them, the trip, the price, and whether it is open, booked or expired. Left their details shows only the people you can follow up with. You also get an email the first time someone leaves their details.
- Booking from a quote. The visitor’s “Book this trip” button opens your rider web app with the trip filled in and locked. They choose when to go, give their name and phone (or sign in) and pay as usual. The ride carries the quoted price even if you changed your rates in the meantime. A quote can be used once.
- A quote is a price, not a reservation. A booked ride arrives like any other, unassigned, and you assign a driver as usual.
- Turn it off by clearing the box in Settings. Visitors then see that quotes aren’t available. Quotes already given can still be booked until they expire.
- Quotes are deleted after a while: 7 days after they expire if the visitor left no details, and 90 days after if they did. The Quotes page is a recent list, not a record.
It covers point-to-point and hourly trips, with a vehicle class and passenger count. It does not take promo codes or extra stops.
Tolls
Drivers enter any toll at the end of a trip, and the rider’s card is charged straight away. The toll page for a trip (open it from the Rides page or from an Overview alert) shows what was charged, who entered it, whether it was entered twice, and any card error.
- Mark as reviewed clears the Overview alert for a toll over $20 or one a driver corrected.
- Add a toll is for a completed trip where the driver forgot one: enter the amount twice and a short note, and the rider’s card is charged now.
- If a toll couldn’t be charged, it appears under Payments (“Failed toll charges”) so it isn’t missed.
Promo codes
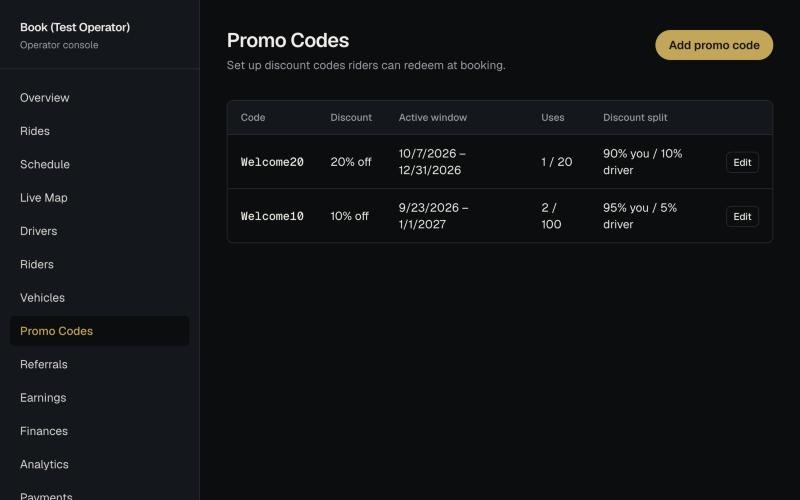
Promo Codes lets you add discount codes riders enter when booking. For each code you set the discount, the dates it is active, how many times it can be used, and the discount split: how much of the discount comes out of your share and how much out of the driver’s (for example 90% you and 10% driver). The list shows how many times each has been used. A trip that is cancelled gives its use back.
Corporate accounts
A corporate account lets a company’s riders bill to one place. Open Corporate to see each company, its billing contact, how many users it has, how it is billed (card on file or invoice) and who pays tips (the rider’s own card or the company card).
- Press Add corporate account and enter the company and its billing contact.
- Open Manage to see the company’s billing status, its riders and what each has spent, and to add a corporate user.
- Press Send invite beside a user who hasn’t signed in yet: they get a link to set up their rider account.
- For a company billed by invoice, trips are collected on a weekly or monthly invoice instead of a card charge. Each invoice is a PDF you can download and is emailed to the company. If a completed trip needs to come off a company’s bill, use Credit on that trip in Rides: it comes off the next invoice.
The company’s own admin, in the rider app, chooses who pays tips and manages the company card.
Payments, refunds and disputes
Riders’ cards are authorized when they book and charged when the trip completes. A trip booked far ahead is authorized only as its pickup approaches. The money goes straight to your own Stripe account, and Stripe’s card fee is the only fee on it.
When a card fails before the trip
For a trip booked days ahead, the fare is authorized automatically about 3 days before pickup. If the card can’t be authorized, the system tells the rider (a notification in the rider app, otherwise a text if they agreed to texts, and an email if there is one on file) so they can update their card, and it tries the card again once a day, up to 3 times in all. The rider can also press Try payment again on the trip in My trips after fixing their card. You see it on the Overview and in the top bar the whole time.
The Payments page (admins)
- Needs attention lists trips whose payment didn’t go through: a card that couldn’t be authorized before an upcoming trip, or a completed trip whose charge failed. The driver is never blocked from finishing. Press Retry payment to run the rider’s saved card again (a trip still ahead gets a hold; a completed trip is charged in full). If the card is declined again, the reason shows in the list; refund or resolve it another way.
- Failed toll charges lists tolls whose card charge failed.
- Disputes lists a rider’s bank chargeback. You answer a dispute with evidence in your own Stripe dashboard; this list just makes sure none is missed.
Issue a refund (admins)
- On the Rides page, press Refund on a paid trip.
- Leave the amount blank to refund everything charged on that payment (including any tip and toll), or type a smaller amount.
- Tick Also take this out of the driver’s earnings if the driver’s pay for that trip should drop by the refunded share. It is off by default: you choose on each refund.
- Press to confirm. The trip page lists each refund and says whether the earnings were changed.
Tip: Stripe does not give back its own card fee when you refund. The fee shows on the trip so you can see it.
Earnings, Finances and Analytics
- Earnings (admins) shows what you owe each driver for a pay period you choose: their share of completed fares, tolls and fees on their own vehicle, tips (100%), and any corrections, with a total. Use the date boxes or This week and Last week. The driver sees the same numbers in the app. MyPlacard calculates what is owed; you pay your drivers yourself.
- Finances (admins) is a statement that adds up: money billed (fares with tax, tolls, tips and late-cancellation fees), minus what was never yours (tax, tips and driver pay), refunds paid back, Stripe’s fees and lost chargebacks, leaving what the business keeps. It also lists money still to collect (trips whose card failed or that have no payment recorded). A trip counts on the day it completes.
- Analytics shows, for the last 7, 30 or 90 days: completed rides, revenue (fares before tax, after discounts and refunds), average rating, how many rides each driver did, the revenue trend, your top drivers and vehicles, and the rating trend. Revenue here is not the same as Finances, which shows what you keep.
The rest of Settings
- Branding. Logo, name and colors; the receipt details printed on every receipt; and your rider app code, link and QR code (download a PNG or a print-ready SVG). On a phone with the MyPlacard app, the code or link opens your company in the app; without it, it opens your web booking page.
- Location. Operating timezone, the day the pay week starts, and your service area (see the quick start).
- Compliance. Your operating authority, printed on every waybill. Changing it later never alters trips already completed.
- Payments & Billing. Your Stripe connection (and Disconnect); your MyPlacard plan, trial end date and how many of the plan’s trips you have used; Cancel subscription; and Download all data, a zip of CSV files with everything MyPlacard holds about your riders, drivers, rides, vehicles and billing (every download is logged). You can export your data at any time, including after you cancel; after cancelling you have 14 days to download it.
- Account. Change your own console password.
Trip records, corrections and the waybill
When a trip completes, MyPlacard saves a permanent copy of it exactly as it finished: the fare calculation, the driver’s pay share, the vehicle, your operating authority and the driver’s credentials. A later change to a rate, a payout percentage or a name never rewrites it. Records are kept for 5 years.
- If something on a finished trip was wrong, an admin adds a correction on the trip page: choose what it is for (fare, tolls and fees, tax or tip), a positive or negative amount, and a required reason. It is dated, attributed to you, kept permanently, and counted in Earnings and Finances. The original record is never edited. A correction changes what you owe; it moves no money by itself.
- The digital waybill. Each trip has a waybill link (and the driver has a QR code). It shows the trip’s live status and the required fields, with the passenger as first name and last initial only, and no phone number or fare. A finished trip’s link stops showing details 7 days after it ends. Share it only when needed.
If something looks wrong
- A trip has no driver and is flagged. Assign one from Rides, or drag it onto a driver on the Schedule.
- I can’t assign a driver. Check that the driver has a payout percentage, isn’t deactivated, and doesn’t have another trip too close in time. On the Schedule, a real overlap is refused.
- A rider says they weren’t charged, or a payment failed. Look under Payments → Needs attention. A trip with no payment recorded usually means the rider never completed payment, or Stripe wasn’t connected when they booked.
- A driver can’t sign in. Open the driver’s page and send a password reset link. Make sure their phone number is right.
- Times look wrong. Check your operating timezone under Settings → Location. A trip finished late in the evening counts on the day it was driven, in that timezone.
- A photo is missing. Photos are shown through links that expire after an hour. Reload the page.
- For anything else, email support@my-placard.com.
Ready-to-go-live checklist
Before you give riders your code, you should be able to tick every line:
- My logo, name and colors are set, and a receipt shows my business details.
- My timezone, pay week and service area are set.
- My rates, vehicle classes, airport fees and tax are set, and the sample quotes look right.
- My booking rules and cancellation policy are set.
- My operating authority is entered.
- Stripe is connected and shows “Charges enabled”.
- Every vehicle and driver is added, with payout percentages, credentials and expiry dates.
- Every driver has been sent an invite and has signed in to the driver app.
- My dispatchers have been invited.
- I have booked, assigned, run and paid for a test trip start to finish, and I know where to find it in Rides, Earnings and Finances.